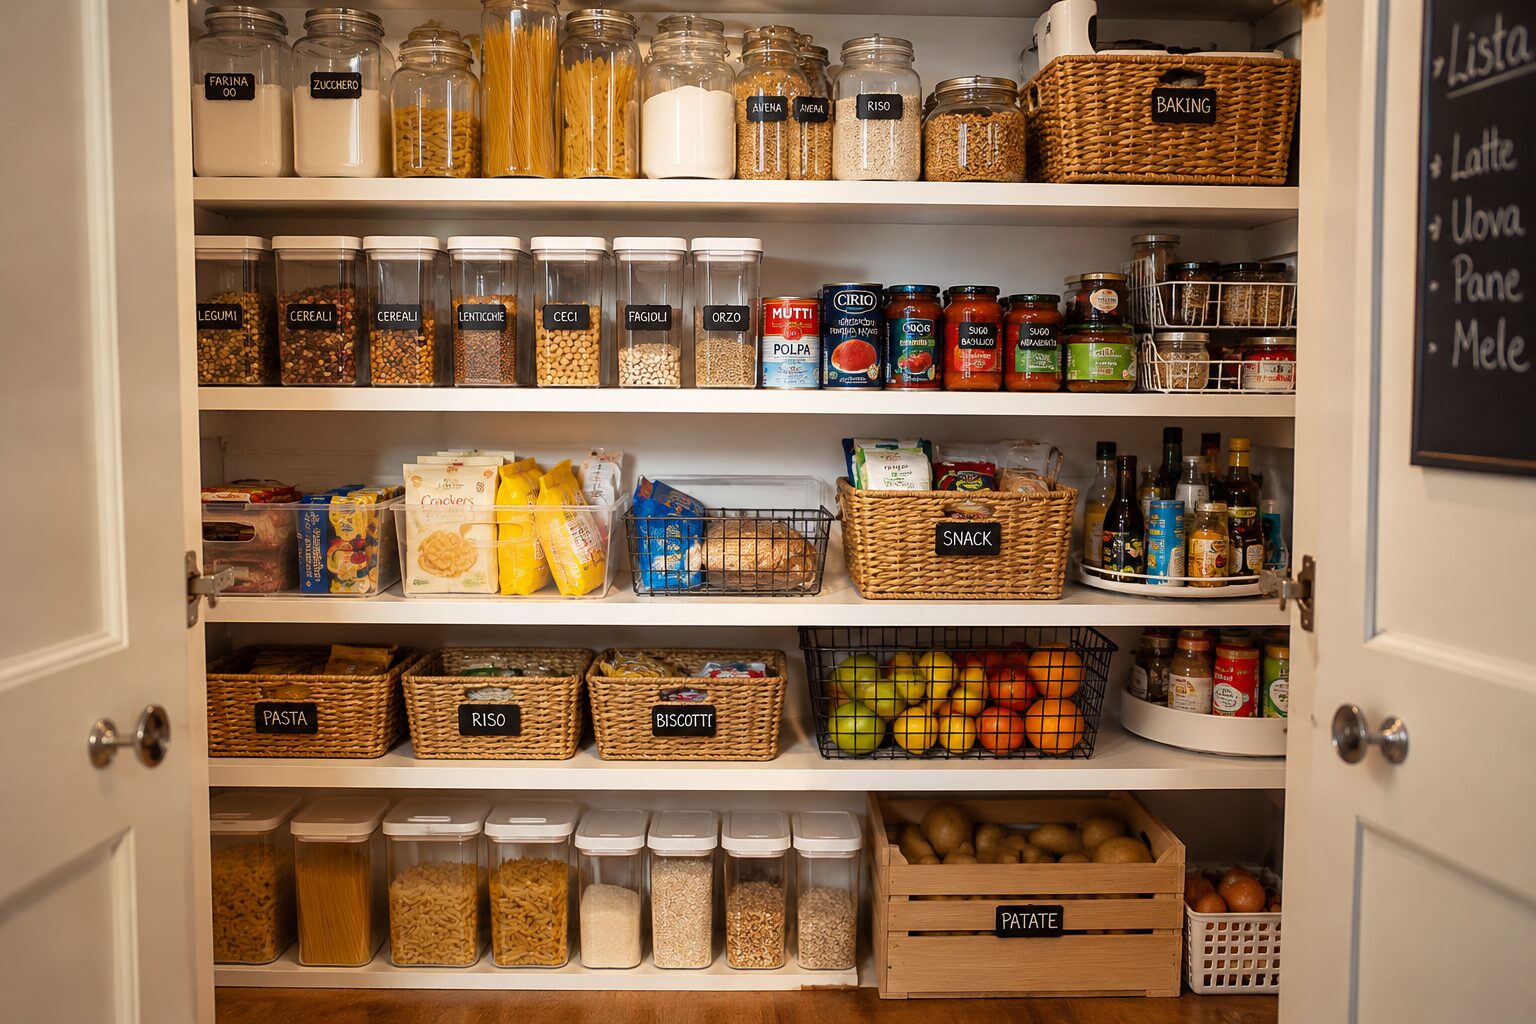
Organizing a messy pantry doesn’t mean having a perfect kitchen to photograph, but being able to immediately find what you need. Pasta, rice, flours, preserves, cookies, spices, legumes, oil, snacks, and open products often end up in the same space without a precise system. The result is a full pantry but not very functional. The problem is almost never the quantity of products, but the way they are arranged. An orderly pantry allows you to cook better, shop more thoughtfully, avoid duplicates, and reduce food waste. Even a small space can become practical if organized by category, frequency of use, and expiration dates.
There’s no need to buy expensive containers right away or overhaul the entire kitchen. The first step is to empty, check, sort, and put everything back in its right place. From there, it’s easier to maintain order over time.
How to organize a messy pantry
To organize a very messy pantry, you need to start from a simple principle: every product must have a specific zone. Pasta should be with pasta, preserves with preserves, flours with baking ingredients, snacks in a separate area, spices in a visible and easy-to-reach spot.
When everything has its place, tidying up after shopping becomes faster. Open packages don’t pile up, products don’t get forgotten at the back of shelves, and the risk of buying what you already have is reduced.
1. Completely empty the pantry
The first step is to remove everything from the shelves. It may seem tiring, but it’s the only way to really understand what the pantry contains. Place the products on a table or free surface and observe quantities, duplicates, open packages, and forgotten foods.
This phase also allows you to clean shelves, corners, and containers. An orderly pantry always starts from a clean space.
2. Check expiration dates
Before putting everything back, check the expiration dates. Discard expired products, evaluate those opened too long ago, and separate foods to be consumed soon.
It’s not enough to look at the date: also check smell, texture, and package condition. Flours, cereals, nuts, and dry legumes deserve special attention, especially if they’ve been open for a long time.
3. Sort everything by category
Once you’ve eliminated what’s not needed, divide the products into groups. The most useful categories are:
- pasta, rice, and cereals;
- flours, sugar, and baking ingredients;
- dry and canned legumes;
- preserves, sauces, and purees;
- oil, vinegar, and condiments;
- spices, herbs, and salt;
- cookies, breakfast cereals, and snacks;
- open products to consume first;
- stock and duplicate packages.
This division makes the actual quantity of available food immediately clearer.
4. Create a zone for products to consume first
One of the most common mistakes is putting products back in the pantry without distinguishing the more urgent ones. Create a small area dedicated to foods to consume first: open packages, products close to expiration, started packs, or ingredients bought for a specific recipe.
This area helps reduce waste and simplifies meal choices in the following days.
5. Use the FIFO method
The FIFO method means “first in, first out”: the first product that went in must also be the first to go out. In practice, when you buy a new package of pasta, legumes, or preserves, place it behind the one already present.
This way, you’ll use older products first and keep track of expiration dates without having to check everything every week.
6. Keep everyday items within reach
The most used products should be at eye level or in a convenient area. Pasta, oil, salt, coffee, breakfast cookies, or cereals shouldn’t end up at the back or too high.
Less accessible shelves are suitable for stock, rarely used products, or seasonal ingredients.
7. Don’t overfill shelves
A pantry packed to the brim looks abundant but often becomes unmanageable. If to get one package you have to move five others, the organization isn’t working.
Leave some free space between categories. This allows you to better see what you have and put products back without creating new mess.
8. Use transparent containers for dry foods
Clear jars and containers are useful for pasta, rice, cereals, flour, sugar, cookies, dry legumes, and nuts. They allow you to immediately see how much is left and better protect foods once opened.
It’s not necessary to transfer everything. You can start with foods you buy often or that tend to spill easily, such as flour, sugar, breadcrumbs, or cereals.
9. Label jars and baskets
Labels help keep things organized, especially when the pantry is used by multiple people in the household. You can label jars with the product name and, if necessary, the expiration date found on the original packaging.
For baskets, generic labels are enough: “pasta,” “sweets,” “spices,” “snacks,” “supplies,” “breakfast.” The goal is not to create an archive, but to make the placement of each item immediate.
10. Group small products into baskets
Packets, stock cubes, yeast, flavorings, spices, single-portion snacks, and small condiments tend to create clutter. Putting them in baskets or shallow containers prevents them from scattering across the shelves.
For example, you can create a basket for baking goods with yeast, vanilla sugar, cocoa, and chocolate chips. Or a basket for herbal teas and infusions, one for spices, and one for snacks.
11. Organize preserves in tidy rows
Preserves take up space and become hard to manage if they are stacked without order. Group tomatoes, legumes, tuna, corn, pickled vegetables, and sauces in neat rows with labels facing forward.
If you have many jars or cans, you can use small shelf risers to see even those placed at the back.
12. Make use of shelf height
Many pantries have high shelves that are underutilized. In these cases, additional shelves, stackable trays, or stackable baskets are useful. They allow you to create more levels and avoid unstable piles.
Vertical space is precious, especially in small kitchens. The important thing is not to make everyday items inconvenient to access.
13. Use the pantry door if available
If the pantry has an internal door, you can use it for lightweight items: spices, packets, small snacks, napkins, food bags, or rolls. Door organizers free up shelf space and make small products visible.
Before installing them, however, check that the door closes properly and that items do not bump against the shelves.
14. Dedicate an area to breakfast
A breakfast zone makes the morning routine easier. You can group biscuits, cereals, toasted bread slices, honey, jams, cocoa, tea, and coffee in the same spot.
This solution is also useful to avoid open packages scattered across different shelves. Everything needed in the morning is concentrated in one area.
15. Create a zone for pasta, rice, and cereals
Pasta, rice, couscous, spelt, barley, and other cereals are often the base of daily meals. Keeping them together helps you choose more easily what to cook and to monitor supplies.
You can further divide them by shape or frequency of use: long pasta, short pasta, rice, cereals, and whole grain products.
16. Keep spices and aromatic herbs separate
Spices need to be visible. If they end up at the back of the pantry, duplicates are bought and they are used less. Arranging them in a dedicated container, on a narrow shelf, or a small riser helps find them quickly.
Periodically check their aroma: spices don’t always become unusable quickly, but they do lose intensity over time.
17. Do not mix food and cleaning products
The food pantry should contain only items intended for the kitchen. Detergents, sponges, garbage bags, and cleaning products should be kept separate, preferably in a different cabinet.
If space is limited and you must use the same area, create a clear separation and keep non-food products in closed, clearly identifiable containers.
18. Provide a space for supplies
Supermarket deals can be useful, but only if you have a dedicated space. A supply area prevents mixing duplicate packages and already opened products.
Keep in supplies items with long shelf life that you actually use: pasta, rice, legumes, tomato sauce, tuna, oil, flour, sugar. Avoid accumulating unusual products that risk being forgotten.
19. Do a quick check before shopping
Before going to the supermarket, open the pantry and check what you really need. A few minutes are enough to avoid unnecessary purchases.
A shopping list made while looking at the pantry is more accurate and helps save money. You can also keep a small notepad or a note on your phone to mark products that run out during the week.
20. Keep the system simple for everyone
A pantry works only if the system is easy to understand. If everything follows a too complicated logic, order won’t last long. Categories must be intuitive even for those living with you.
Better to have a few clear areas than many divisions that are hard to maintain. The goal is to find and put away food without overthinking it.
How often should you tidy the pantry?
A complete check can be done every two or three months, but a small weekly check is enough to maintain order. During the week, just put away opened packages, check the area of products to consume first, and update the shopping list.
A deep tidy, instead, is useful during seasonal changes, before holidays, or when you notice that the pantry has become chaotic again.
Mistakes to avoid
The first mistake is buying containers before knowing what you need to organize. First empty and sort, then evaluate what is truly necessary.
The second mistake is trying to make everything too aesthetic. A pretty pantry that is inconvenient doesn’t work. Priority must be practicality: see, take, use, and put back in the correct place.
The third mistake is accumulating too many supplies. Having a well-stocked pantry is useful only if foods are consumed regularly and monitored over time.
In brief
Organizing a messy pantry requires method more than space. Emptying, checking expiration dates, sorting by categories, and creating clear zones can transform even a small pantry into a much more functional space.
The secret is building an order that is easy to maintain. You don’t need all jars to match or perfect shelves; you need to know where everything is, use what is already open first, and buy only what is really missing.
With a practical system, the pantry becomes daily help in the kitchen: it reduces waste, simplifies shopping, and makes preparing everyday meals easier.
Frequently asked questions
How to start organizing a very messy pantry?
The best way is to completely empty it, clean the shelves, check expiration dates, and sort all products by categories. Only then should you decide where to place each group of food items.
What to put in transparent containers?
Transparent containers are useful for pasta, rice, flours, sugar, cereals, dried legumes, cookies, and nuts. They help to immediately see what is inside and how much product is left.
How to avoid buying duplicates?
It’s advisable to keep similar products in the same area, do a quick check before shopping, and place new packages behind those already present. This way, older products are used first.
How to organize a small pantry?
In a small pantry, you should make use of height with additional shelves, use baskets for small products, and keep only what is used often within reach. Stocks should be limited and well separated.
How often should you check the pantry?
A quick check every week helps maintain order. A more thorough inspection can be done every two or three months, or during seasonal changes.
{
“@context”: “https://schema.org”,
“@type”: “FAQPage”,
“mainEntity”: [
{
“@type”: “Question”,
“name”: “Come iniziare a organizzare una dispensa molto disordinata?”,
“acceptedAnswer”: {
“@type”: “Answer”,
“text”: “Il modo migliore è svuotarla completamente, pulire i ripiani, controllare le scadenze e dividere tutti i prodotti per categorie. Solo dopo conviene decidere dove sistemare ogni gruppo di alimenti.”
}
},
{
“@type”: “Question”,
“name”: “Cosa mettere nei contenitori trasparenti?”,
“acceptedAnswer”: {
“@type”: “Answer”,
“text”: “I contenitori trasparenti sono utili per pasta, riso, farine, zucchero, cereali, legumi secchi, biscotti e frutta secca. Aiutano a vedere subito cosa c’è e quanto prodotto è rimasto.”
}
},
{
“@type”: “Question”,
“name”: “Come evitare di comprare doppioni?”,
“acceptedAnswer”: {
“@type”: “Answer”,
“text”: “Conviene tenere i prodotti simili nella stessa zona, fare un controllo veloce prima della spesa e mettere le confezioni nuove dietro quelle già presenti. In questo modo si usano prima i prodotti più vecchi.”
}
},
{
“@type”: “Question”,
“name”: “Come organizzare una dispensa piccola?”,
“acceptedAnswer”: {
“@type”: “Answer”,
“text”: “In una dispensa piccola bisogna sfruttare l’altezza con ripiani aggiuntivi, usare cestini per i prodotti piccoli e tenere a portata di mano solo ciò che si usa spesso. Le scorte devono essere limitate e ben separate.”
}
},
{
“@type”: “Question”,
“name”: “Ogni quanto bisogna controllare la dispensa?”,
“acceptedAnswer”: {
“@type”: “Answer”,
“text”: “Una verifica veloce ogni settimana aiuta a mantenere l’ordine. Un controllo più completo può essere fatto ogni due o tre mesi, oppure nei cambi di stagione.”
}
}
]
}


